Posts

Showing posts from 2016

How to enable Inspect element in Postman

Image
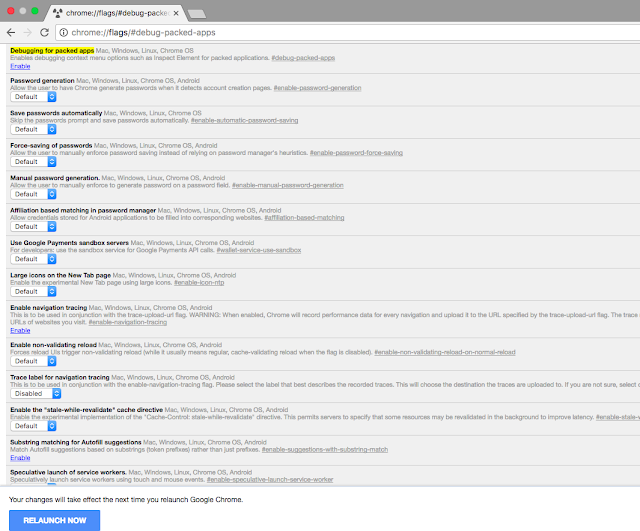
How to enable Inspect element in Postman  Step 1: Open your chrome browser and type the following code in url  chrome://flags/#debug-packed-apps Under Debugging for packed apps click on Enable Link . and then click RELAUNCH NOW button Step 2 : Open your Postman app and right click on the window and click on inspect . refer Snapshot  Now you can easily check what all requests being hit on the server with request formation . 2 In case you are unable to see the requests and response in the inspect element you could try below steps . You can head to chrome://extensions, enable 'Developer Mode', and search for the Interceptor. Click the "Inspect views: background.html" link to open DevTools. You should see the requests and responses in the Interceptor's DevTools window when you make requests through Postman.

Automate Rest Api's using Python

Automate Rest Api's using Python  Automation of rest API using python is done by inbuilt library of python , Python package index Request Installation Installing Requests via pip is fairly simple, just run this in your terminal. $ pip install requests For more detailed documentation refer http://docs.python-requests.org/en/master/ Sample Code import requests url = "http:// vulcan-olpstaging.unicommerce.info:8089 /trips/lastmile" headers = {     'content-type': "application/json",     'cache-control': "no-cache",     } payload ={ "pyMessage": { "Tasks": [{ "Task": { "CONSIGNE_STATE": "Delhi", "CONSIGNE_NAME": "sonu sharma", "WIDTH": 10.0, "CREW_CODE": "OLP9876", "TRIP_TYPE": "FWD", "TASK_ACTION": "ADD", "DATE": "2016

Constructing Curl from Python , HTTP , PHP , Java Request

Image
Constructing Curl from Python , HTTP , PHP , Java Request      Constructing curl , python request , PHP ,JAVA Open postman client and click on code [Below save button ] refer snapshot . when click on code another window appears . refer snapshot . similarly ,  you can generate various other request [curl , python ,java , php ] refer snapshot Constructing HTTP request from curl request >> 1. Click on import >> Paste Raw Data Text , paste curl request , refer snapshot  

Testing SOAP API using JMETER

Image
Testing SOAP API using JMETER I would like to demonstrate Testing of SOAP API's in Jmeter . Let's take an example of below soap request to be tested . End Point of the Soap API : - https://${Staging}:443/services/soap/?version=1.6&facility=04 Soap Request:- <soapenv:Envelope xmlns:ser="http:// uniware.unicommerce.com /services/" xmlns:soapenv="http://schemas.xmlsoap.org/soap/envelope/">    <soapenv:Header>       <wsse:Security soapenv:mustUnderstand="1" xmlns:wsse="http://docs.oasis-open.org/wss/2004/01/oasis-200401-wss-wssecurity-secext-1.0.xsd" xmlns:wsu="http://docs.oasis-open.org/wss/2004/01/oasis-200401-wss-wssecurity-utility-1.0.xsd">          <wsse:UsernameToken wsu:Id="UsernameToken-1">             <wsse:Username>testing</wsse:Username>             <wsse:Password Type="http://docs.oasis-open.org/wss/2004/01/oasis-200401-wss-userna

How To Automate Rest API in Postman

Image
How To Automate Rest API  in Postman  1.  Let us take an example in which we need to create shipment  Step 1 : login via username /password and then getting the access token in response . [ Login API ] Step 2 : Creating the shipment each time with unique AWB no . [ automating AWB no in request ] and passing the access token in header generated via Step 1.   login API POST Request http://XXX/oauth/token?grant_type=password&client_id=my-trusted-client&username=user1&password=pass1 Header Content-Type : Application/json Response {   "access_token": "eyJhbGciOiJIUzI1NiJ9.eyJleHBpcmF0aW9uIjoxNDc3MzE1NjMyMjc1LCJpc3N1ZWRBdCI6MTQ3NzMwNTYzMjI3NSwiaXNzdWVyIjoiT2xwQXV0aCIsInR5cGUiOiJhY2Nlc3NfdG9rZW4iLCJpc3N1ZWRGb3IiOiJha3NoYXkuYWdhcndhbEB1bmljb21tZXJjZS5jb20iLCJvdGhlckNsYWltcyI6e319.EmWoYEOXRjlloZlfM9ggHftxmnlowzPxFI9gPOAOnBk",   "token_type": "bearer",   "refresh_token": "eyJhbGciOiJIUzI1NiJ9.eyJleHBpc

Stimulate 2G, 3G , 4G network speed on Jmeter

How To stimulate different networks (2G, 3G ,4G, wifi , ethernet ) on Jmeter Jmeter gives you the option to stimulate different network speeds (2G, 3G ,4G ,wifi , Ethernet) based on your requirement . 1. Open bin folder of jmeter and search for user.properties file 2. Add the below code to your user.properties file    #Default    httpclient.socket.http.cps=0    httpclient.socket.https.cps=0    #2G network     httpclient.socket.http.cps=21888    httpclient.socket.https.cps=21888    #EDGE network     httpclient.socket.http.cps=  49152    httpclient.socket.https.cps=  49152    #3G network     httpclient.socket.http.cps=  256000    httpclient.socket.https.cps=  256000    #4G network     httpclient.socket.http.cps=21888    httpclient.socket.https.cps=21888      3.  Restart  jmeter By default its value is set to zero which means it can allow maximum traffic and with no limitation. Here’s the formula of calculating “cps”:

ADD EMPTY HEADER IN JMETER SAMPLE REQUEST

Image
ADD EMPTY HEADER IN J-METER SAMPLE REQUEST            In Jmeter Test Plan if you have multiple Request Sampler with globally defined HTTP Request Header and in one Request Tester does not want to use globally defined HTTP Request Header and want to edit/delete the Header with new header value.       Solution : - Add Bean Shell Preprocessor to that request and write the following code . import org.apache.jmeter.protocol.http.control.Header; sampler.getHeaderManager().remove(1); In Below Test Plan HTTP Request Header cointains 2 headers values -> Content-Type – Application/json Authorization – ${access_token} In Request OauthToken1,  I want to use header value as Content-type – text/xml and want to remove Authorization value . Add Bean shell preprocessor to OauthToken 1 . with above-defined code . Result :- In OauthToken1 Request , header values is passed as Content-type – text/xml with no authorization .